3D printer supplies
Moderators: BeligerAnt, petec, administrator


Re: 3D printer supplies
One thing I'd say is that you do have to think differently when making an ant to be printed on a FDM machine as opposed to SLA (like shapeways uses). They don't get the same levels of strength SLA Nylon can when printed so you may find that chassis to be more fragile than you expect. I'm not sure whether you've designed that chassis strong enough to survive hitting things with the spinner.
Nuts And Bots - For all your components and ready built antweights!
Alex Shakespeare - Team Shakey / Nuts And Bots / Team Nuts:
AWS 44, 45, 49, 51 & 55 Winner - Far too many robots!
Alex Shakespeare - Team Shakey / Nuts And Bots / Team Nuts:
AWS 44, 45, 49, 51 & 55 Winner - Far too many robots!
Re: 3D printer supplies
Yeah, this was more just a test as I had the STL file ready to go. The plan is to attach polycarbonate outer panels to further strengthen the chassis, as I used to do with the shapeways prints. But the motor mount will definitely need beefing up in the next attempt.

-
peterwaller

- Posts: 3213
- Joined: Fri Feb 15, 2002 12:00 am
- Location: Aylesbury Bucks
- Contact:
Re: 3D printer supplies
Just had a go at printing a new chassis for Anticyclone.
On my old machine although it printed the lid mounting plates they were never atached to the walls properly so I had to print them seperately and glue them in so I was interested to see what the I3 made of them.
I was concerned when it said it was going to be 5.5 hours to print but I ran it anyway.
It printed perfectly with no lifting or distortion until it got to the plates where it proceeded to fill in the whole top of the robot printing a very creditible but unusable lid.
The ability in cura to look at each slice soon showed me that this was how the drawing was being interpreted by the slicer software even though the image in Cura looked OK.
I have now changed the drawing and the slicer now looks as though it will make it correctly and it is now down to just over 3 hours.
I shall give it another go at the weekend.
Re: 3D printer supplies
I got a weird case like that though thankfully just in a small hole to give a bolt room. I had to just rebuild that part of the model to fix it. But hey at least it did a lid 
Nuts And Bots - For all your components and ready built antweights!
Alex Shakespeare - Team Shakey / Nuts And Bots / Team Nuts:
AWS 44, 45, 49, 51 & 55 Winner - Far too many robots!
Alex Shakespeare - Team Shakey / Nuts And Bots / Team Nuts:
AWS 44, 45, 49, 51 & 55 Winner - Far too many robots!
-
peterwaller
- Posts: 3213
- Joined: Fri Feb 15, 2002 12:00 am
- Location: Aylesbury Bucks
- Contact:
Re: 3D printer supplies
I was really impressed that it could cover the whole top without any support structure just a pity I couldn't get any parts inside.
I have just started the reprint so I will see how it goes.
I have just started the reprint so I will see how it goes.
-
peterwaller
- Posts: 3213
- Joined: Fri Feb 15, 2002 12:00 am
- Location: Aylesbury Bucks
- Contact:
Re: 3D printer supplies
Just looking at upgrading my Prusa i3 to heated bed
All was going well until I tried running the Adruino software with which I couldn't get the code to compile and eventually blew away the firmware in the printer without actually trying a down load.
Fortunately 10 mins in 3D printworld and they had not only got the printer working again but had downloaded the new firmware for the heated bed.
I still have to connect the new power supply but it is displaying both head and bed temperatures which is a good start.
-
peterwaller
- Posts: 3213
- Joined: Fri Feb 15, 2002 12:00 am
- Location: Aylesbury Bucks
- Contact:
Re: 3D printer supplies
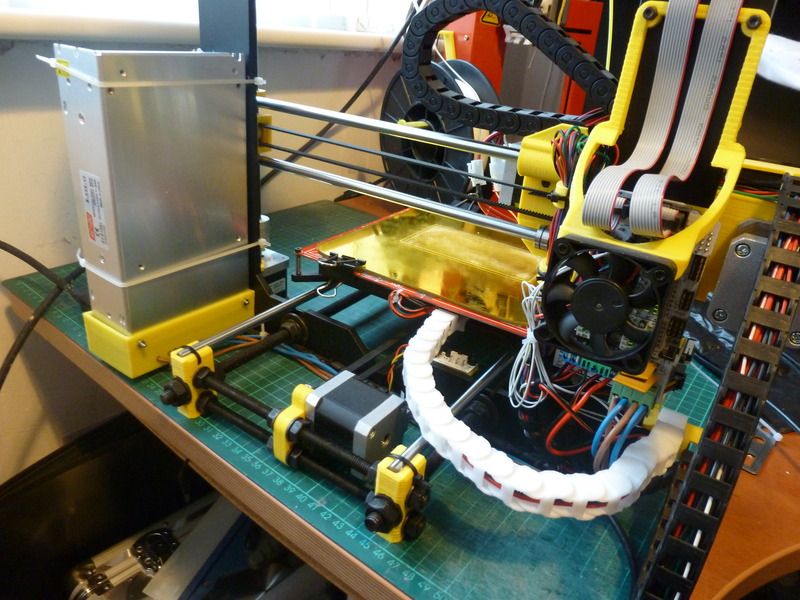
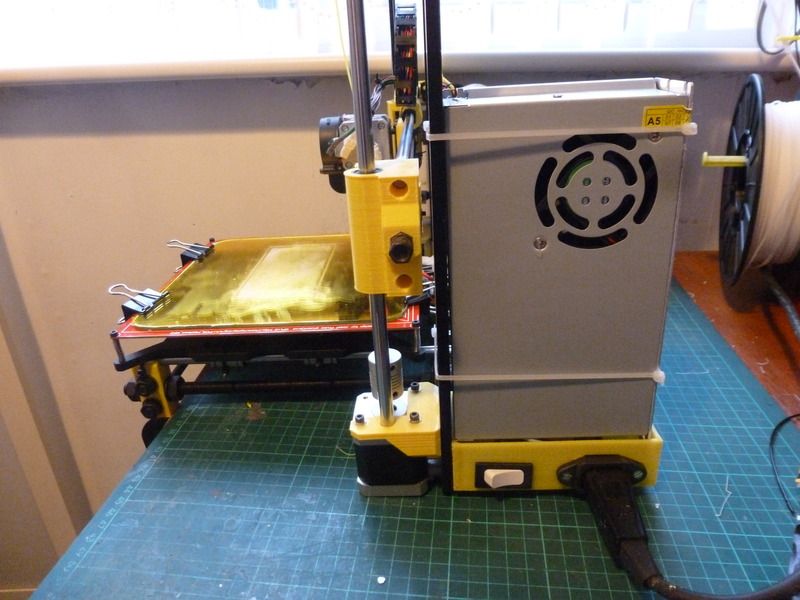
All working now here are a couple of shots showing the heated bed wire support and the new power supply.
-
peterwaller
- Posts: 3213
- Joined: Fri Feb 15, 2002 12:00 am
- Location: Aylesbury Bucks
- Contact:
Re: 3D printer supplies
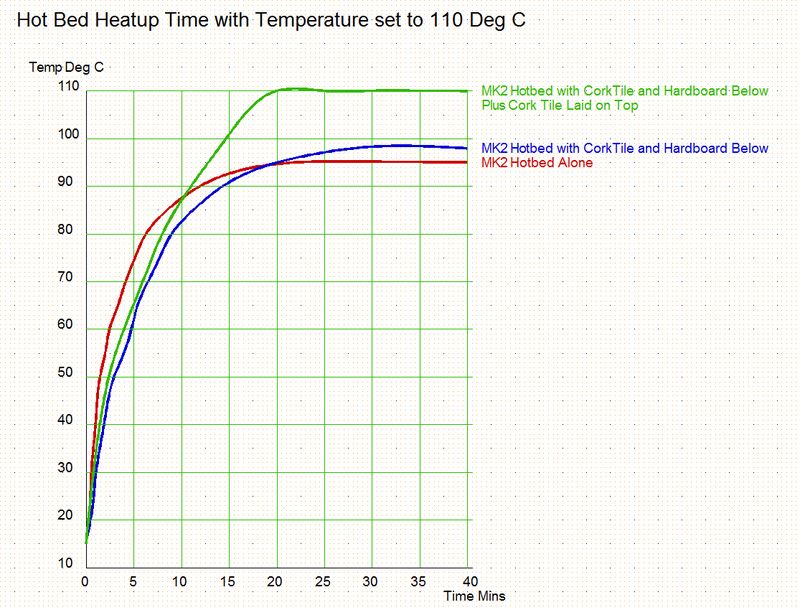
I have noticed that the Prusa I3 takes quite a time to heat up the hot bed to anything above 80 c.
One of the chaps from the shop had suggested a cork tile under the hot bed would improve things and I had noticed Alex laid his Lipo bag on top of the bed during the heating period.
So I did a test, with Cura set to 110 c, with just the heated bed, the bed with a cork tile below it supported by a piece of hardboard and the same but with another cork tile laid on top.
The hot bed alone got to its maximum of 95 C in 20 mins.
With the cork tile below it was slower to warm up to start with due to the higher thermal capacity but got to 95 c in 20 mins and peaked at 98 c after 30 mins.
The third set up heated up faster to 95 c in 12 mins, leveling off at the programmed 110 c after 20 mins.
Below is a graph.
I have also been trying out the Capton with mixed results.
Some times if there is a large serface area it works OK bur other times I have had to use a glue stick as well but I have found the walls around 1mm thick which were often hollow on the up printer are much better filled on this one.
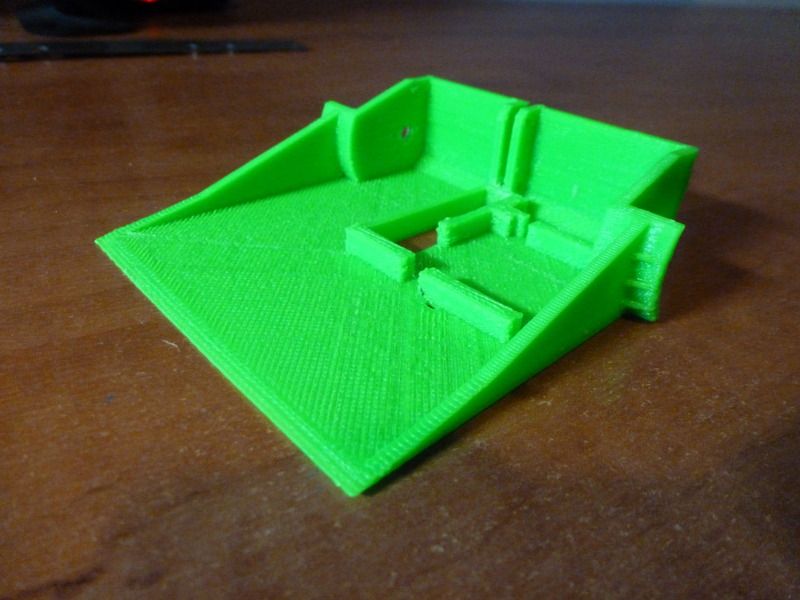
Here's and example of the new flippant chassis in a rather nice if understated fluorescent green ABS.
I have also had a play with some of the Filaflex rubbery material.
So far I have only really managed too jam up the filament feed but apparently you need to turn off the filament withdraw function so I will need to try again.
My hope is that it might be useful as supplementary armor plus I am hoping to use it molded into my tracks to stop them being so stretchy.
A quick test with just a length of the filament looks promising and unlike with latex it doesn't ruin the curing process.
One of the chaps from the shop had suggested a cork tile under the hot bed would improve things and I had noticed Alex laid his Lipo bag on top of the bed during the heating period.
So I did a test, with Cura set to 110 c, with just the heated bed, the bed with a cork tile below it supported by a piece of hardboard and the same but with another cork tile laid on top.
The hot bed alone got to its maximum of 95 C in 20 mins.
With the cork tile below it was slower to warm up to start with due to the higher thermal capacity but got to 95 c in 20 mins and peaked at 98 c after 30 mins.
The third set up heated up faster to 95 c in 12 mins, leveling off at the programmed 110 c after 20 mins.
Below is a graph.
I have also been trying out the Capton with mixed results.
Some times if there is a large serface area it works OK bur other times I have had to use a glue stick as well but I have found the walls around 1mm thick which were often hollow on the up printer are much better filled on this one.
Here's and example of the new flippant chassis in a rather nice if understated fluorescent green ABS.
I have also had a play with some of the Filaflex rubbery material.
So far I have only really managed too jam up the filament feed but apparently you need to turn off the filament withdraw function so I will need to try again.
My hope is that it might be useful as supplementary armor plus I am hoping to use it molded into my tracks to stop them being so stretchy.
A quick test with just a length of the filament looks promising and unlike with latex it doesn't ruin the curing process.
Re: 3D printer supplies
Alex had the same problem; I suggested he upped the voltage on the heated bed to 15v and his heats up very quickly now. Does mean you need a separate 15v power supply for the bed, but it's simple enough to wire in. I did the same on my Fabrikator and it makes such a difference.
Rory Mangles - Team Nuts
Robots: Nuts 2 and many more...
NanoTwo Motor Controllers: https://nutsandbots.co.uk/product/nanotwodualesc
Robots: Nuts 2 and many more...
NanoTwo Motor Controllers: https://nutsandbots.co.uk/product/nanotwodualesc